
Overview
In this tutorial, we're going to go over how to manually do your bookkeeping for Amazon with QuickBooks Online without any apps or integrations.
By the end of this tutorial, you will have all of your Amazon transactions perfectly imported into QuickBooks Online with 100% accuracy to the penny. We introduce a CPA-approved method that all accountants should understand instantly. It should also make it easy to file taxes yourself if you choose to do so.
You'll be able to keep track of all of your sales, refunds, taxes, fees, etc. and view all of your business financial reports such as the Profit/Loss and Balance Sheet.
However, this does come with a few caveats, namely you will only import entire summaries at once, and you cannot use inventory tracking to calculate cost of goods sold automatically. Stay tuned till the end to learn about a software that helps you do all this automatically and more!
QuickBooks Online Setup
First, we need to set up QuickBooks Online properly. There are many QuickBooks objects to set up here involving the chart of accounts, customers, vendors, and items. Please pay attention carefully.
Business Checking Account
In QuickBooks Online, you likely already have a business savings account or checking account where you deposit all of your Amazon payouts. Make sure you have this bank account setup and all its transactions synced with QuickBooks.
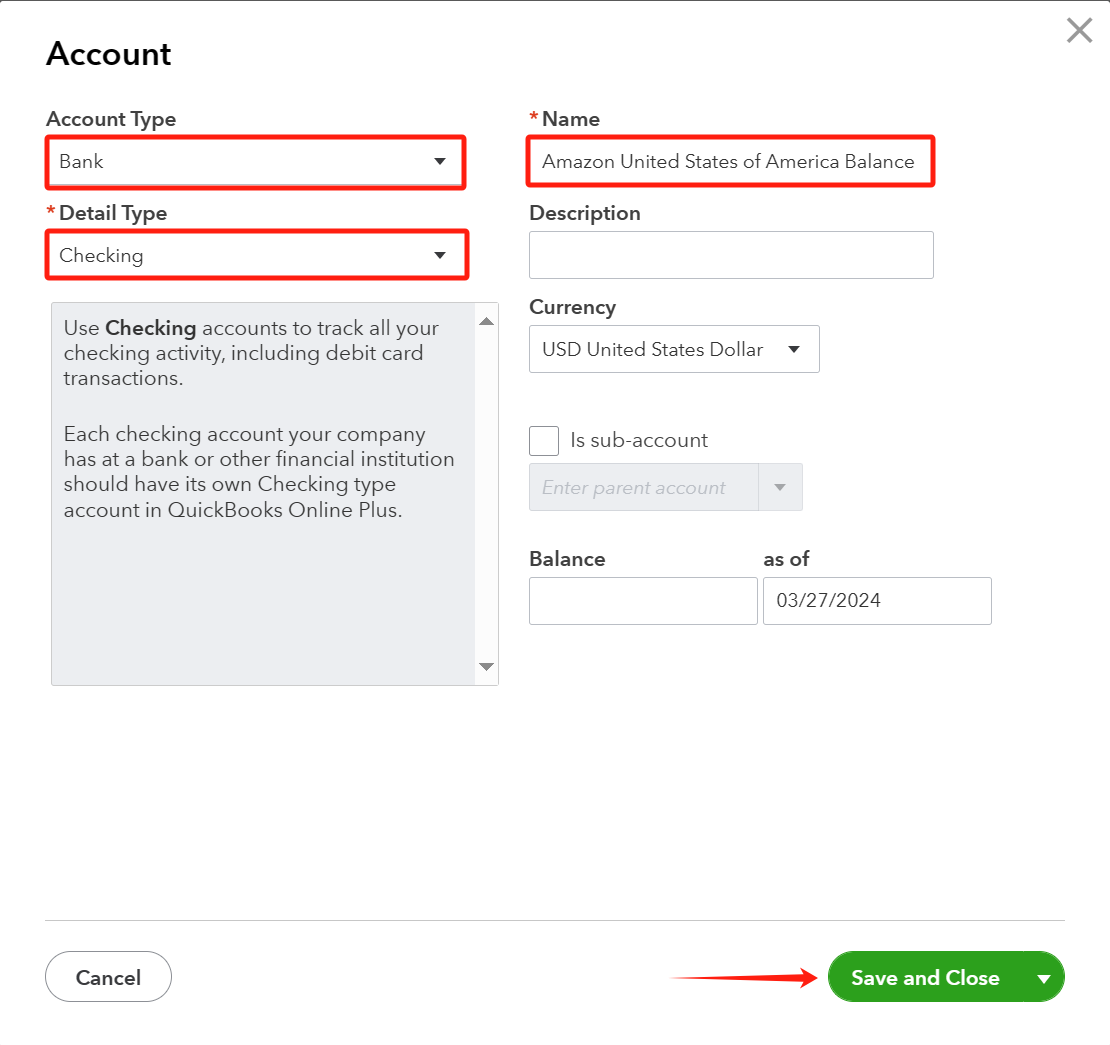
Amazon Balance Account
Amazon holds your money for every settlement period and pays you out at the end of the period. Even though the money hasn't been transferred into your own business bank account yet, this money is still technically yours, and we need to keep track of it in an Amazon Balance "Holding" Account.
Each marketplace in Amazon holds your money and pays out separately on a different schedule. Therefore, if you sell in different Amazon marketplaces, you will need to create separate "holding" accounts. I recommend you name it "Amazon United States of America Balance" if it's the US market. Likewise for other marketplaces, I recommend you name it "Amazon Canada Balance" for the Canadian market.
This way, if you look at the Balance Sheet, you will see the total balance that your business owns, including the amount stored in your bank account and the amount stored with Amazon waiting to be transferred to your bank account.
Income Accounts and Items
Next, we need to create income accounts for every type of income that the business generates on Amazon. We also need to generate a NonInventory Item of the same name, so that an item is attached on the sales receipt in QuickBooks. This way, when we look at the profit and loss report, you will see exactly where the income comes from.
First, we want to create a parent income account to place all the different types of sales income under. We name this "Sales (Klavena)".
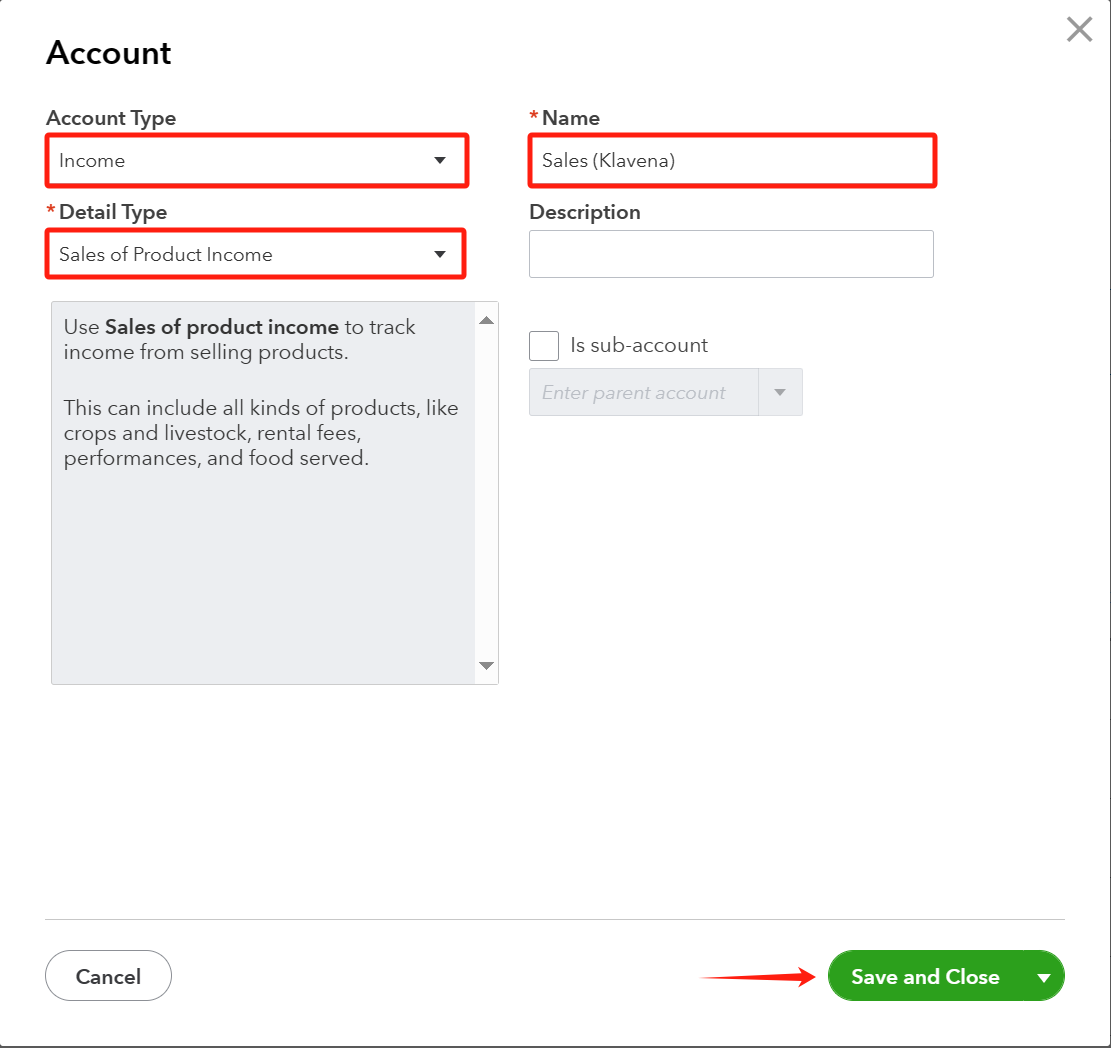
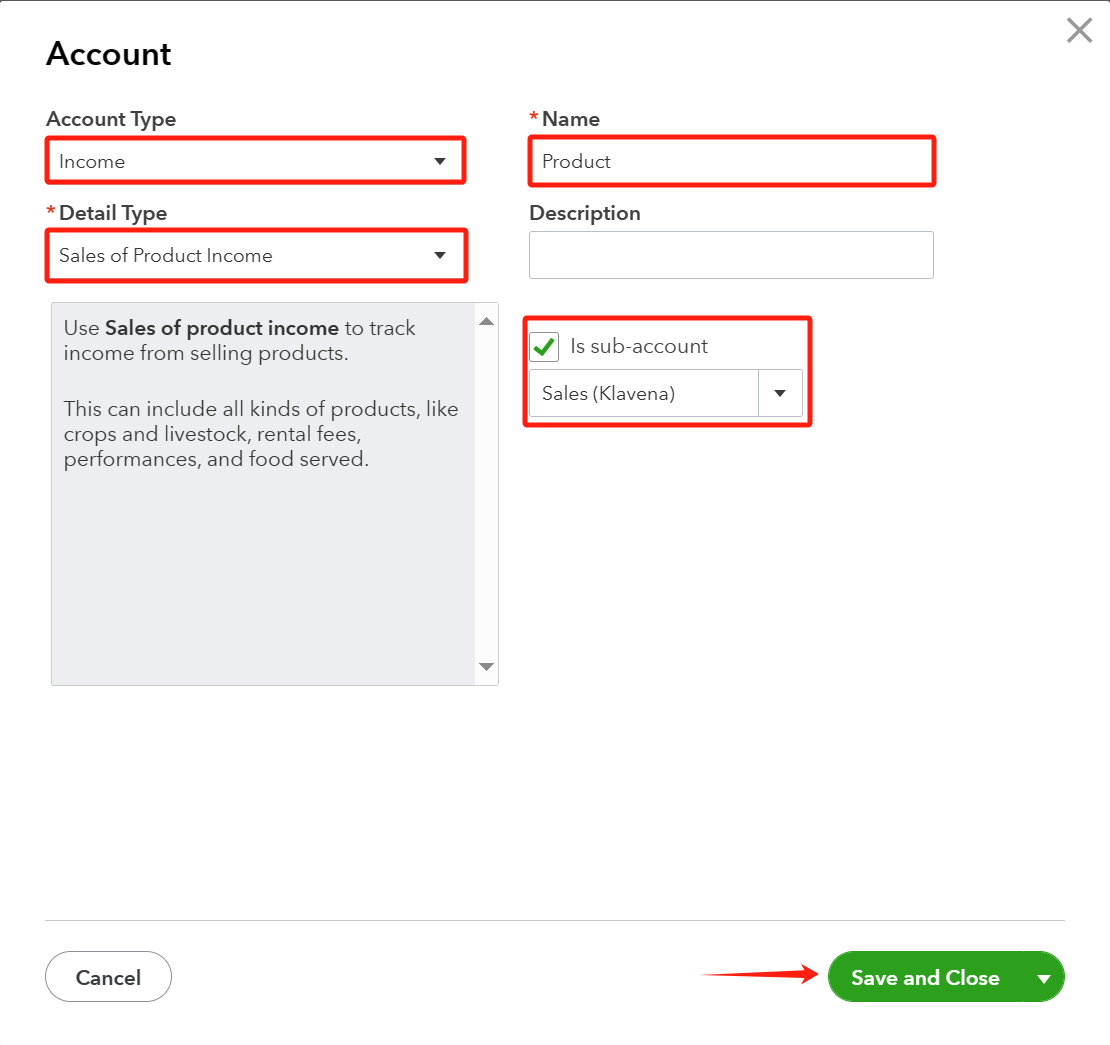
These are the income sub-accounts and non-inventory items to generate:
- Product
- Tax
- Shipping
- Promotion
- Other
The following screenshot is for the "Product" income sub-account.
Next, head over to Products and Services and create a new non-inventory item with the name of "Product" and link it to your newly created Sales (Klavena):Product income sub-account.
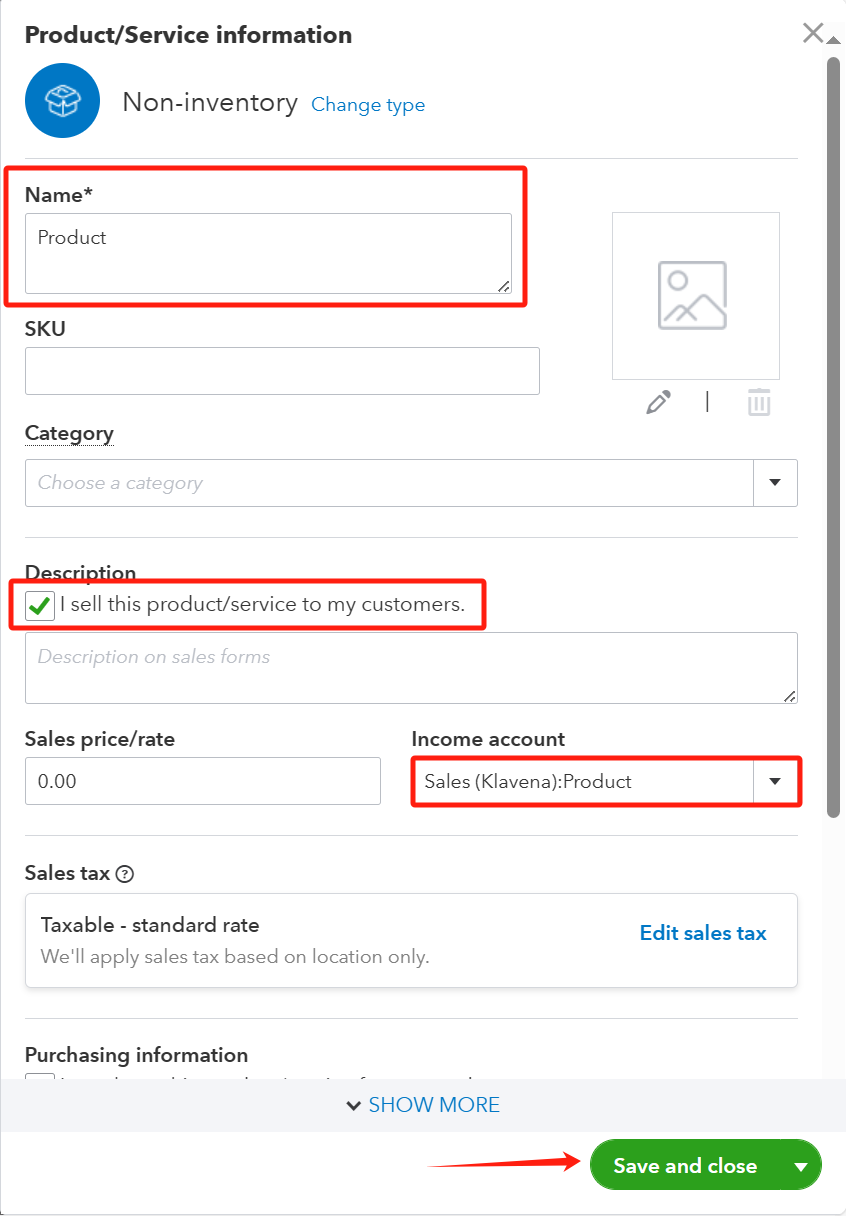
The above screenshots are only for one of the income sub-accounts and items. Make sure to do the same for the other accounts. Just switch the name from "Product" to "Tax", "Shipping", "Promotion", "Other", and create the income sub-accounts and noninventory items for each of those categories.
Expense Accounts and Items
We also need to create expense account for every type of income that the business generates on Amazon. In this case, we don't need to create NonInventory Items for each of these because we will write the expenses in QuickBooks in a slightly different way.
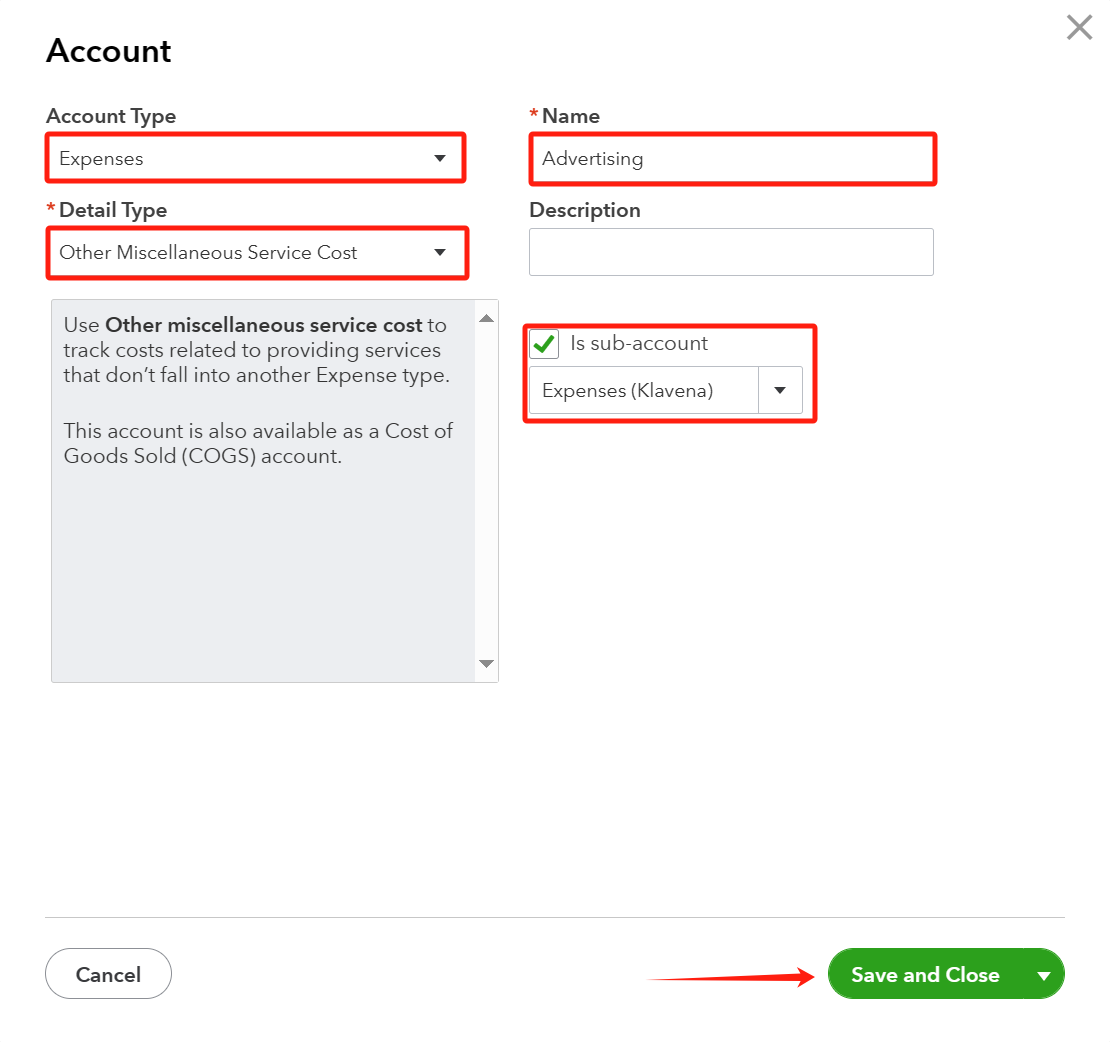
First, we want to create a parent expense account to place all the different types of expenses under. We name this "Expenses (Klavena)".
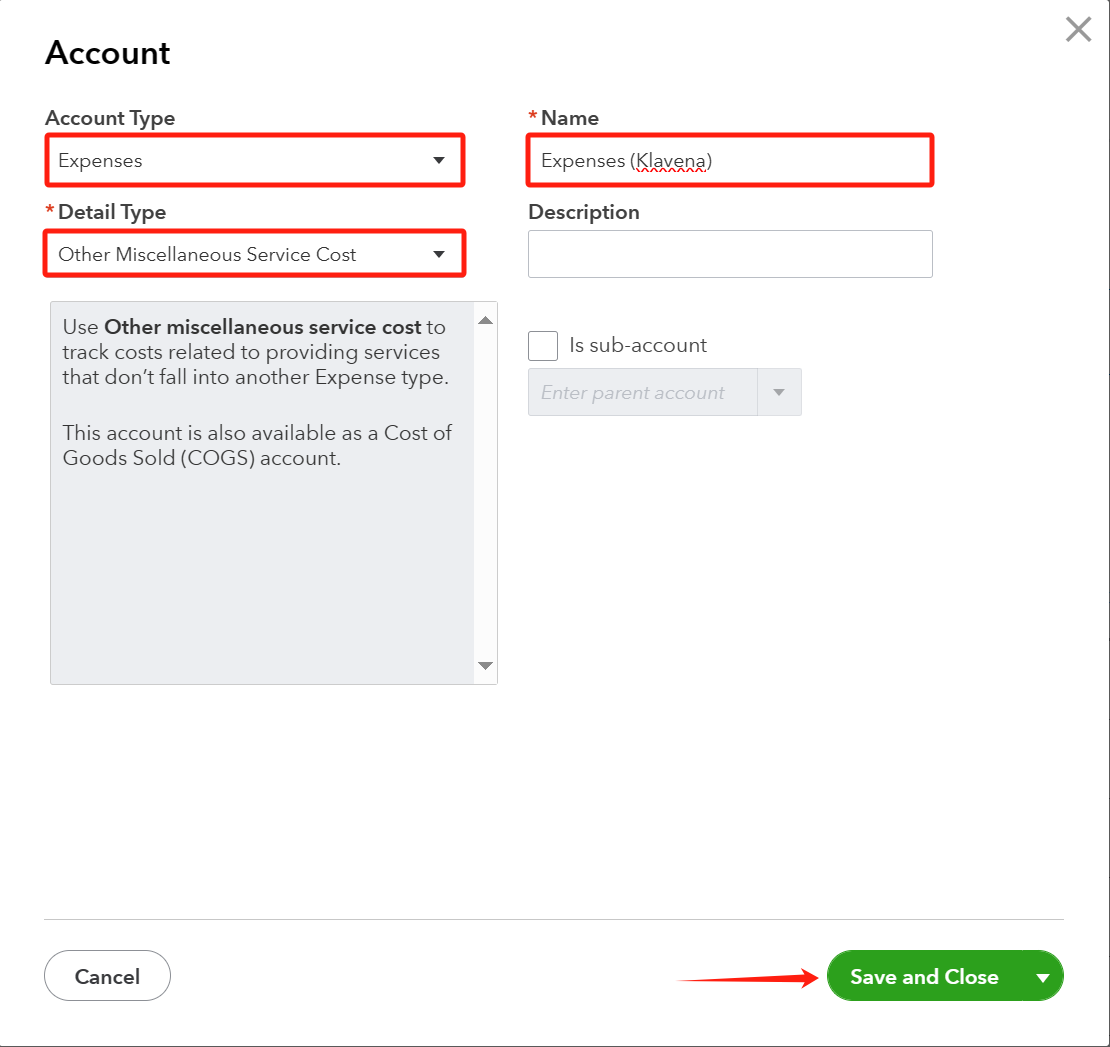
These are the expense sub-accounts to generate:
- Commission
- Fulfillment
- Storage
- Advertising
- Miscellaneous
Customer
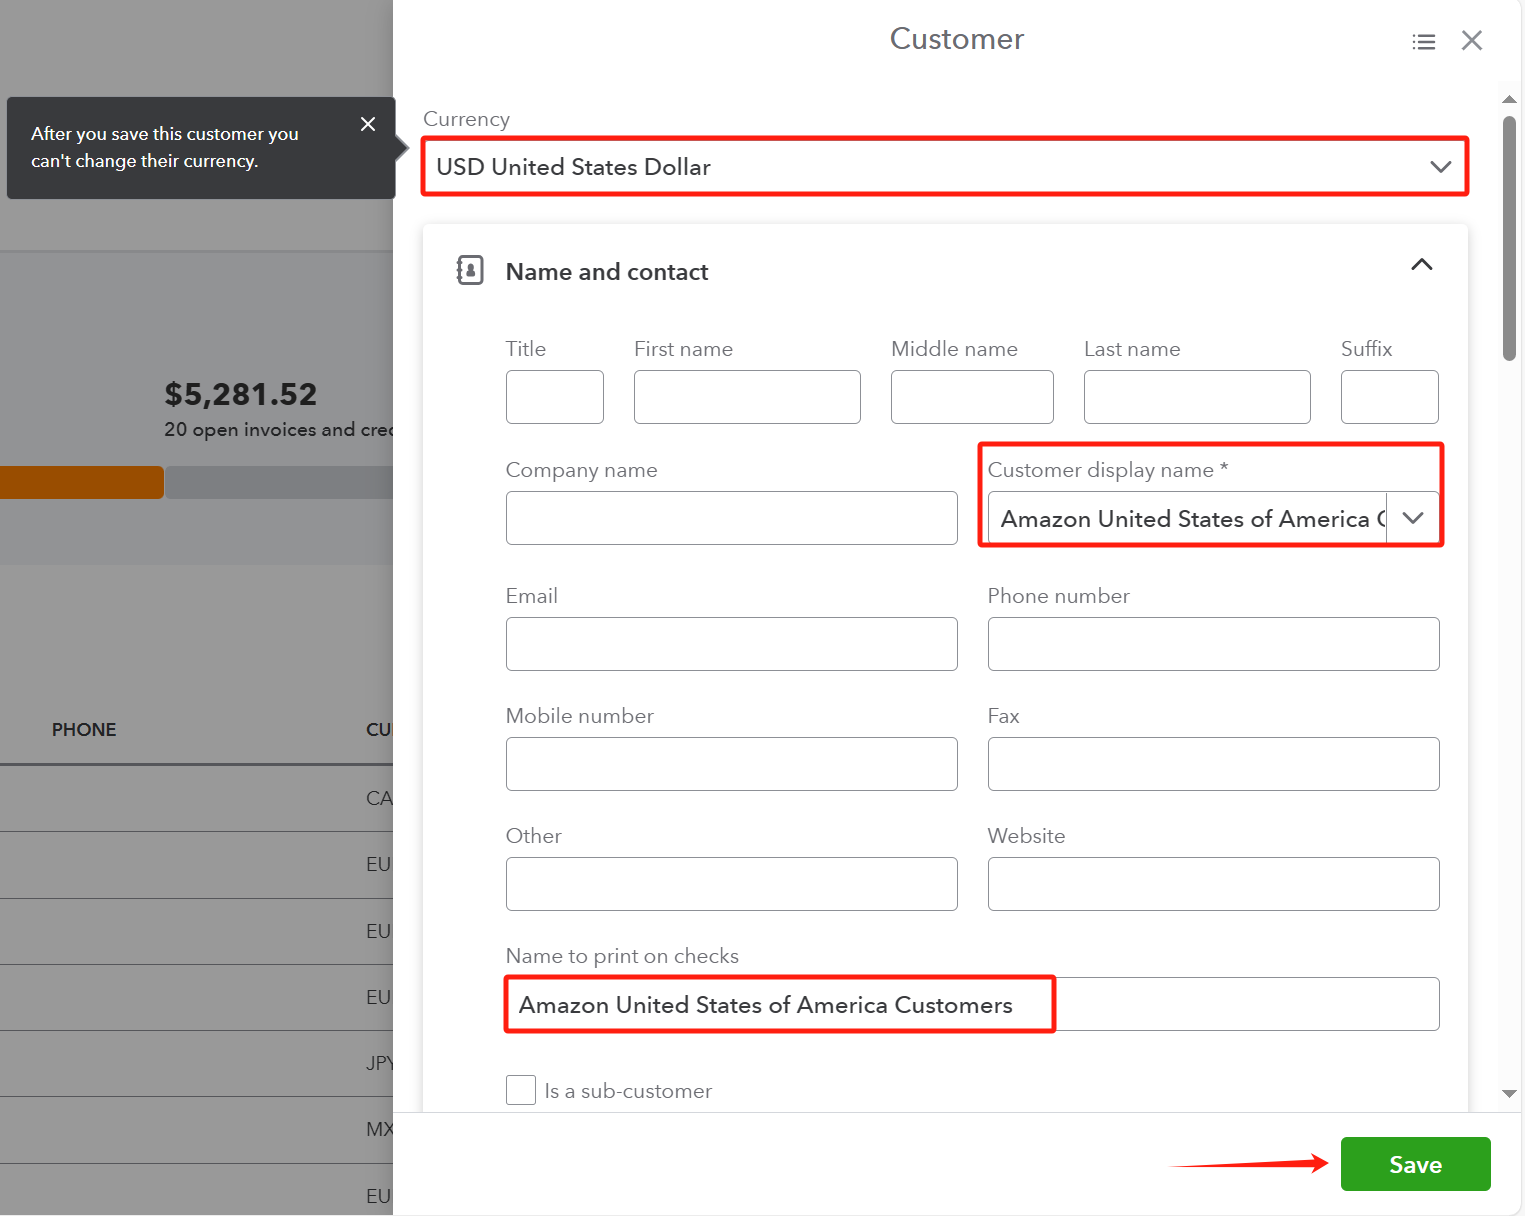
Next, we create a generic Customer in QuickBooks that represents all the Amazon customers you have. Name it "Amazon [Insert Marketplace] Customers". Since we are importing summary transactions, we won't have to write the details the of every individual customer. It only matters that the money is coming from Amazon customers as a whole. Make sure to specify the correct currency for the marketplace. You need a Customer object for each marketplace you have.
Vendor
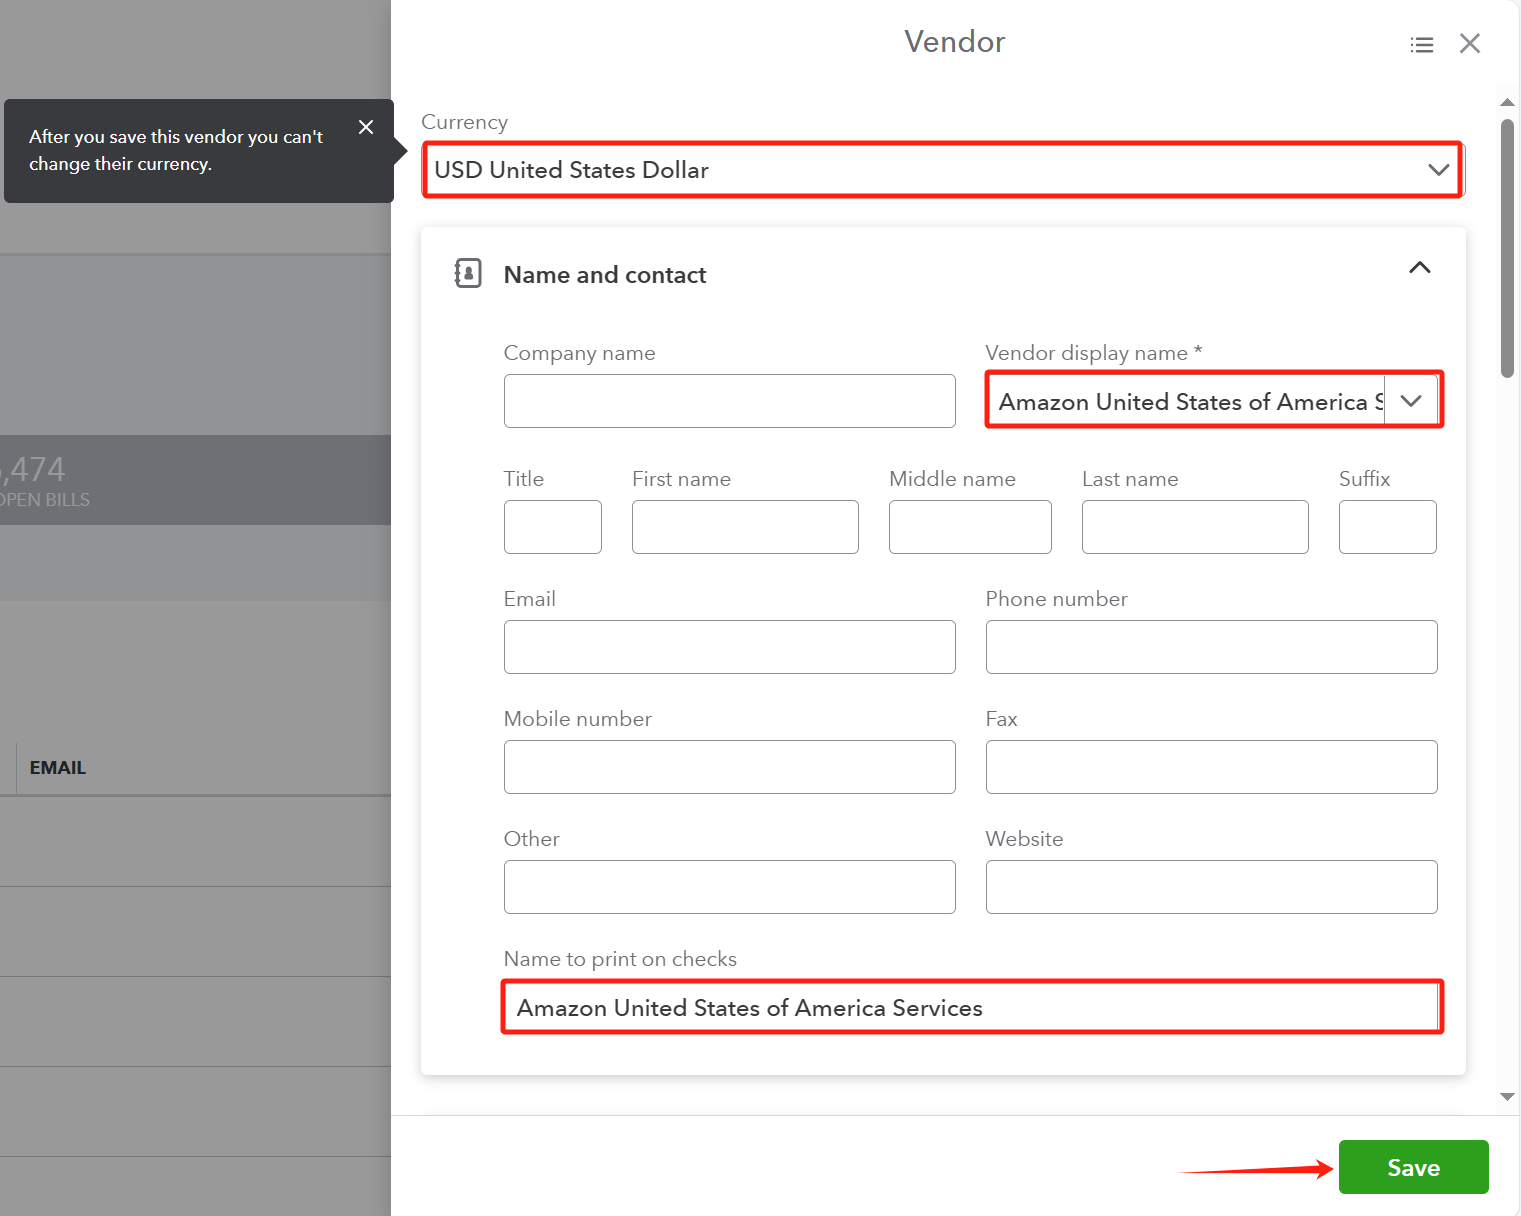
Next, we create a generic Vendor in QuickBooks that represents all the Amazon services you purchase from. Name it "Amazon [Insert Marketplace] Services". Make sure to specify the correct currency for the marketplace. You need a Vendor object for each marketplace you have.
Amazon Marketplace Data
After setting up your Quickbooks Online account, the next step is to summarize your Amazon data into the correct categories and create the appropriate transactions within QuickBooks.
The easiest way to generate summaries of your Amazon sales data is to use what's already available in the statement view. It shows all of the sales and expenses for a particular settlement period.
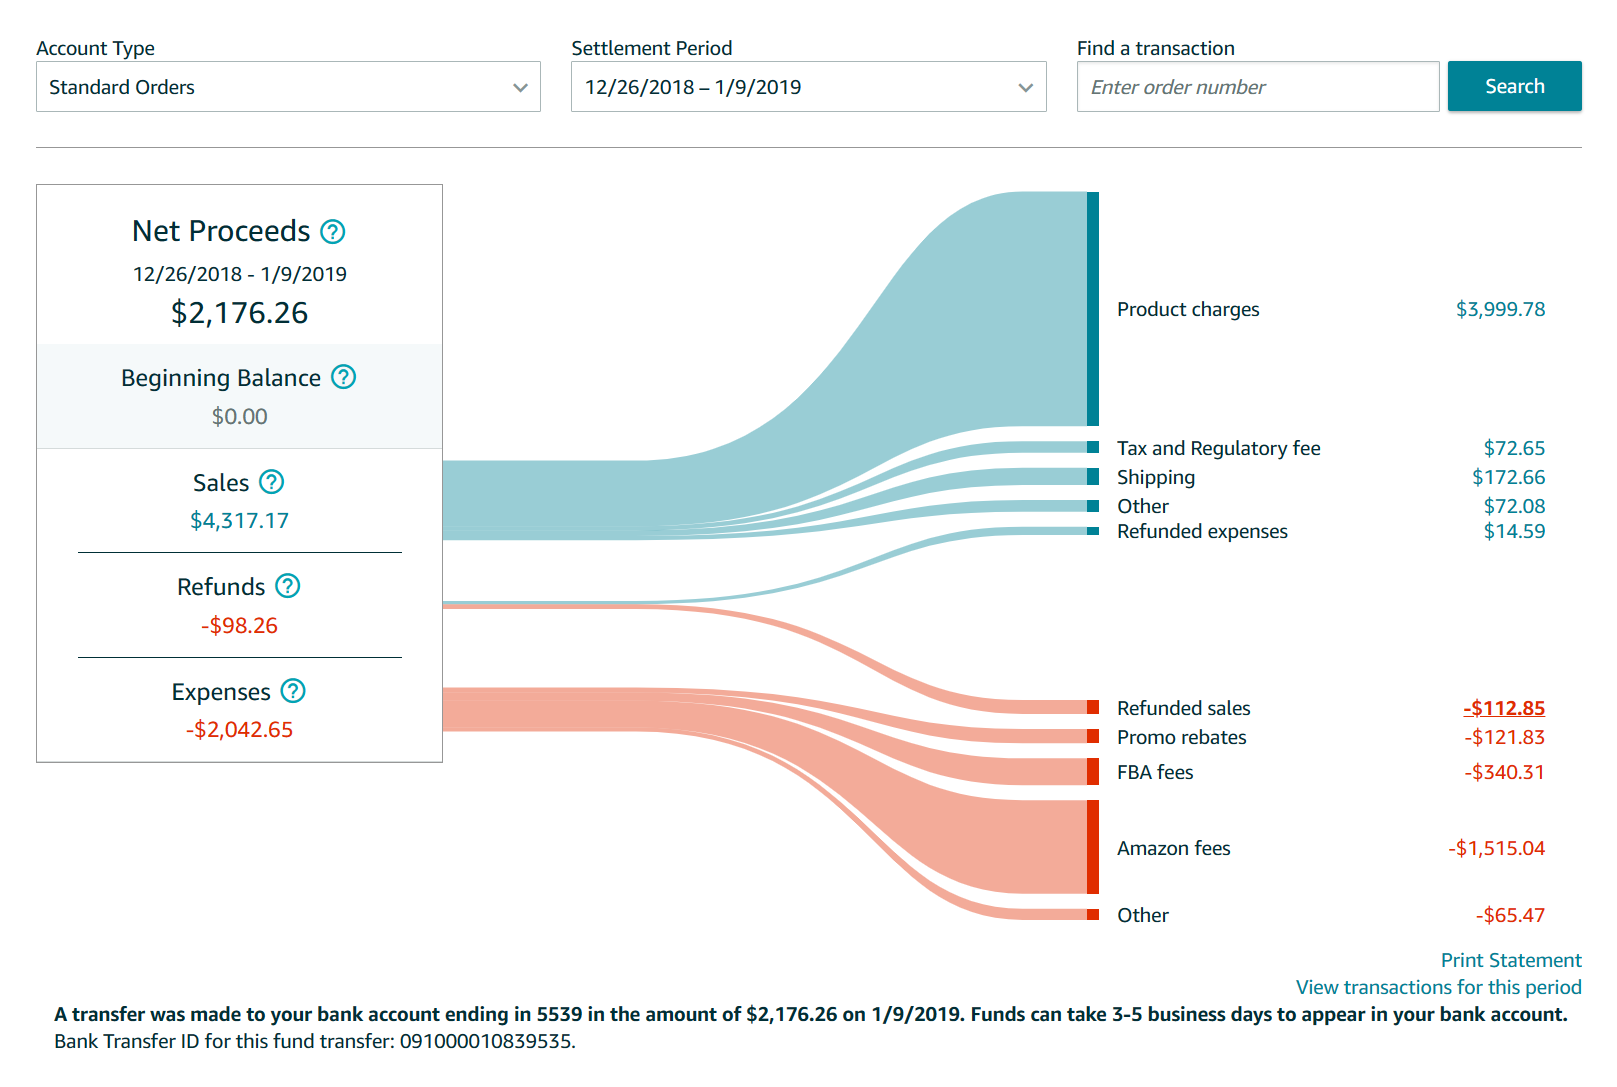
Each settlement period is two weeks with an arbitrary start and end date. I recommend this method because it is aligned with the payouts that you receive from Amazon.
Entering Summary Data into QuickBooks
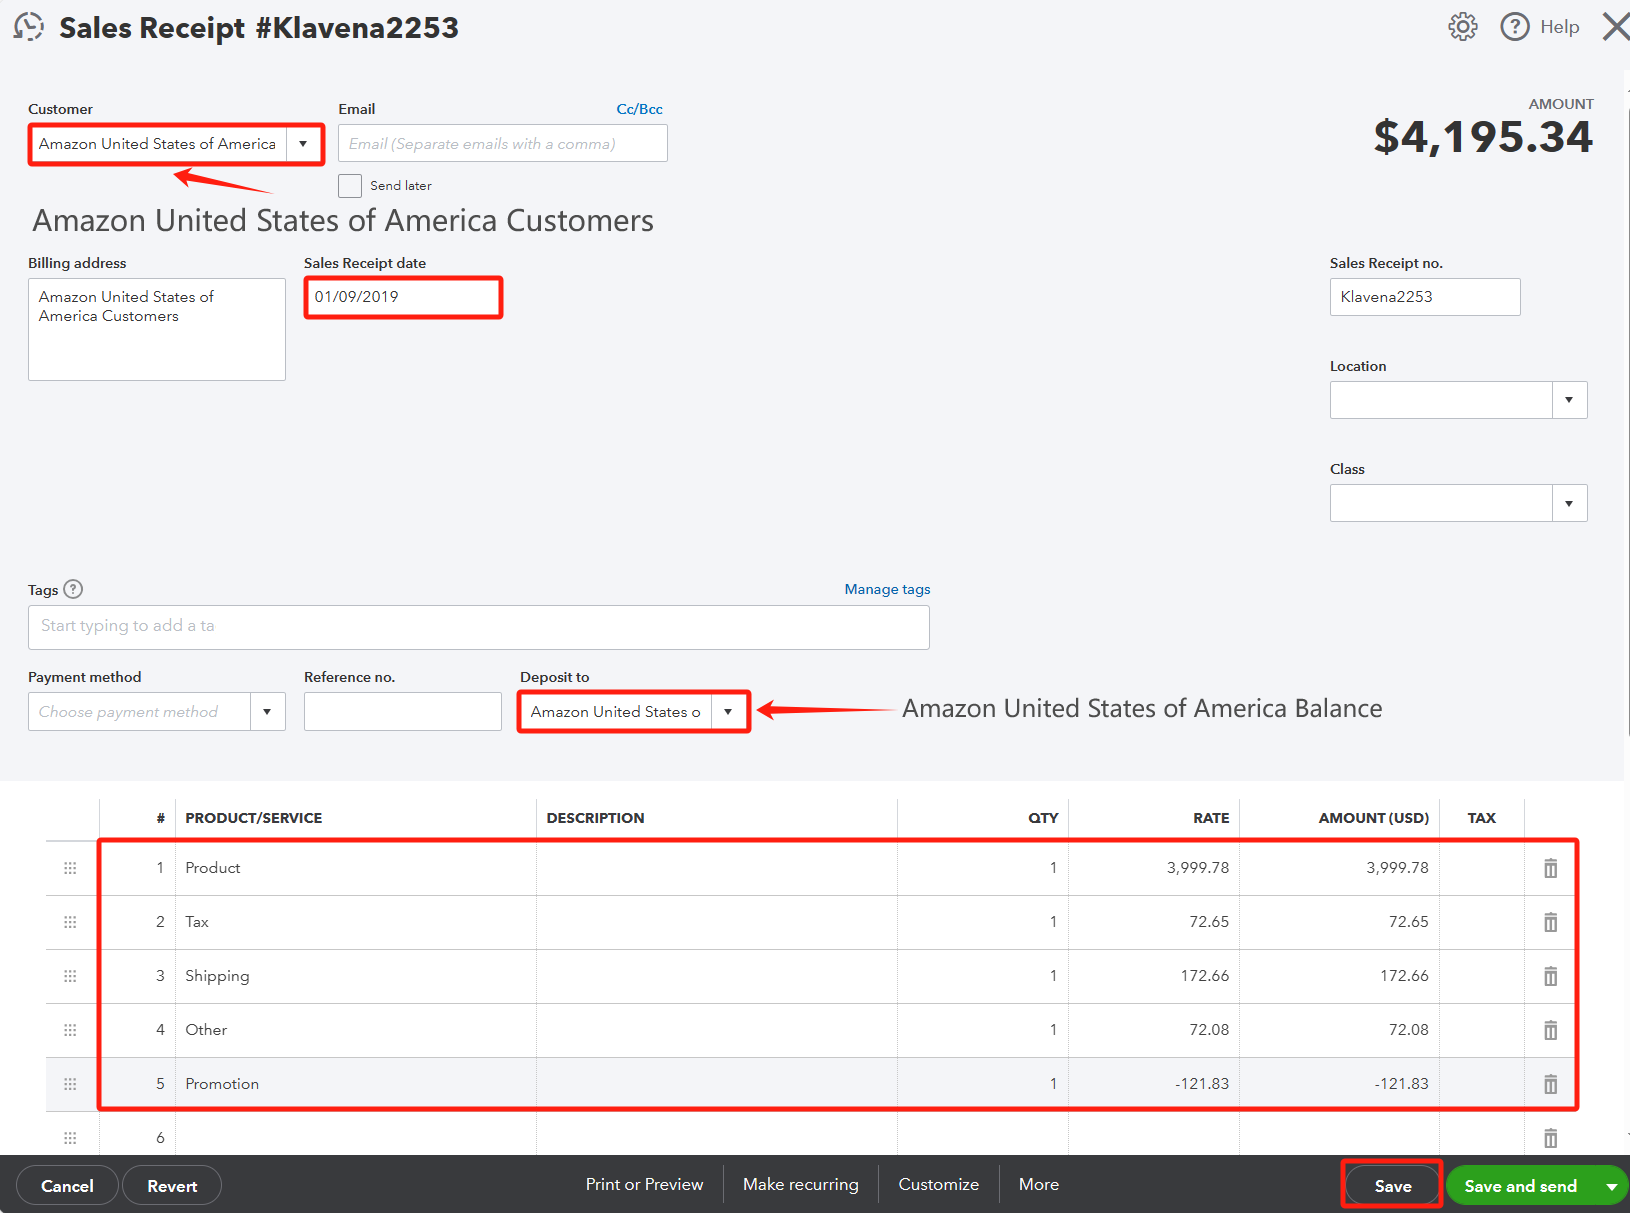
Sales Receipt
- Product charges -> Product
- Tax and Regulatory fee -> Tax
- Shipping -> Shipping
- Other -> Other
- Promo rebates -> Promotion
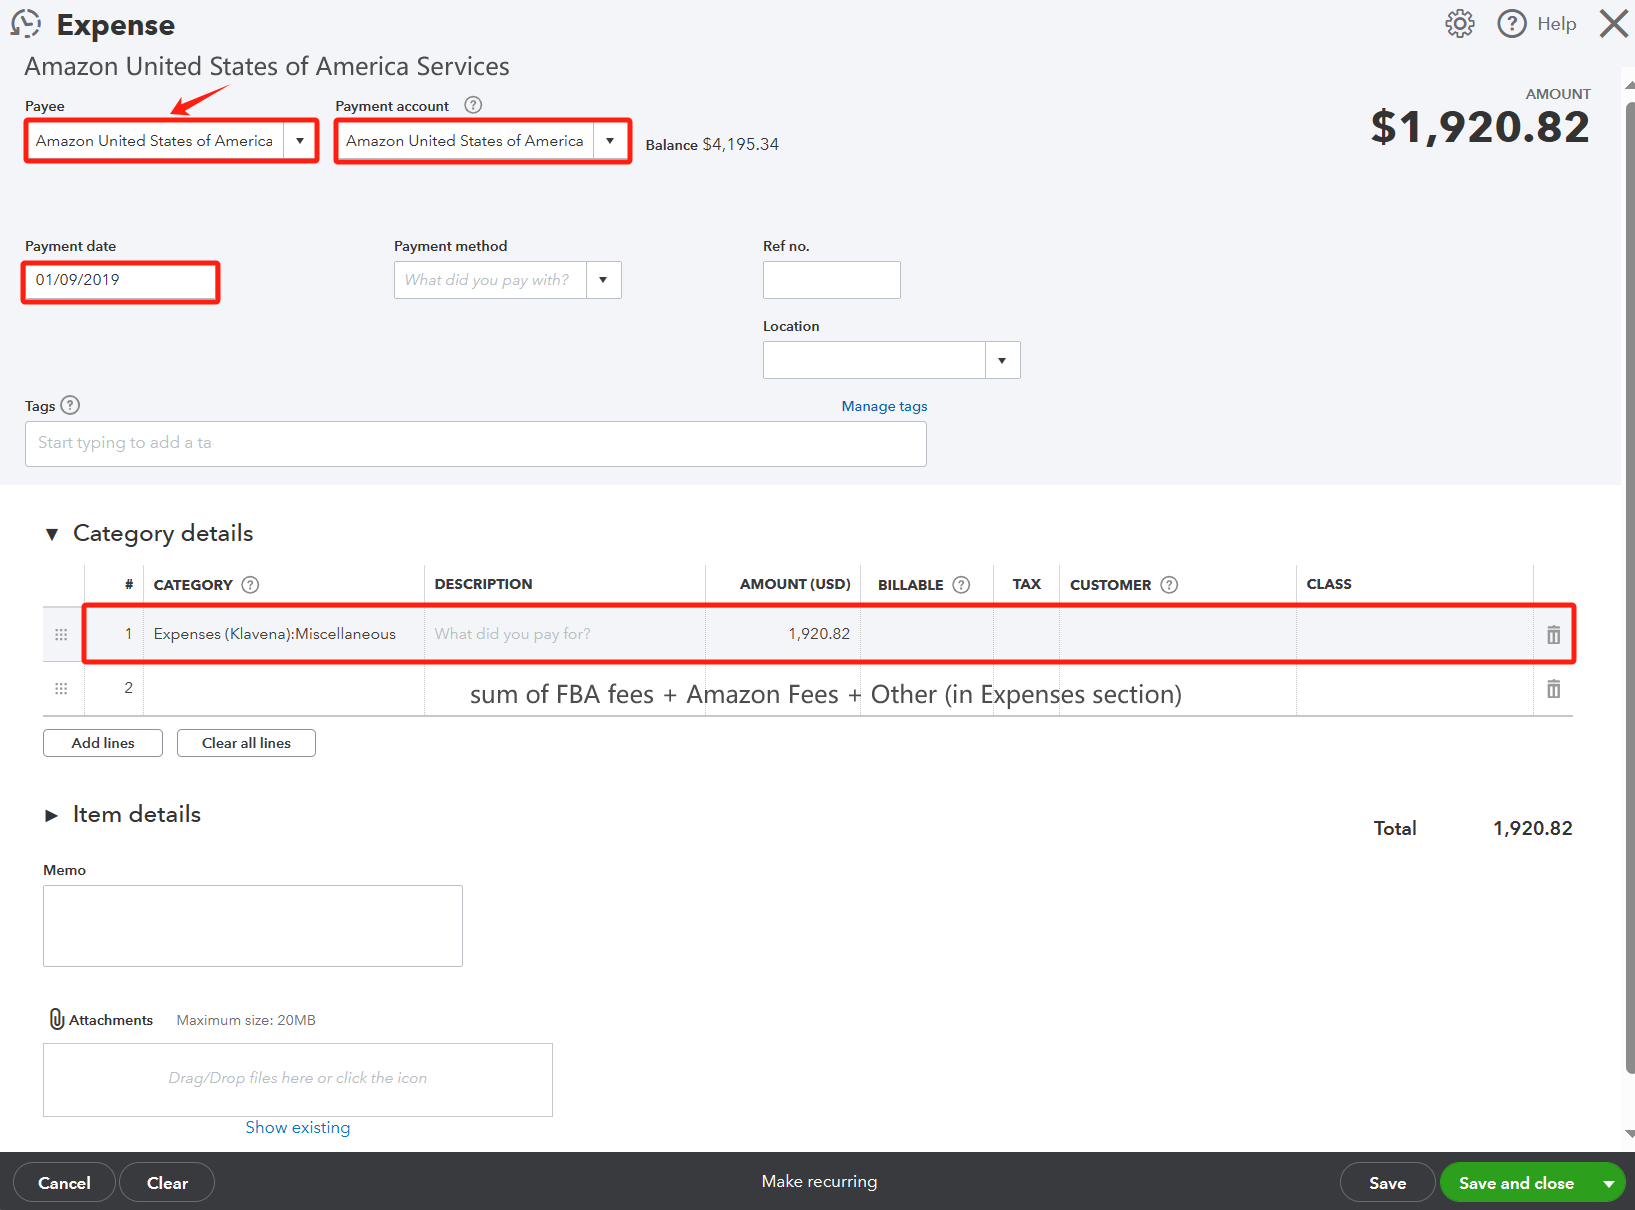
Expense
Because it's hard to categorize FBA fees, Amazon fees, and Other into our categories of Commission, Fulfillment, Storage, Advertising, we assign every expense into the generic Miscellaneous category. You'll need to sum these numbers up and put in Miscellaneous.
- FBA fees -> Miscellaneous
- Amazon fees -> Miscellaneous
- Other -> Miscellaneous
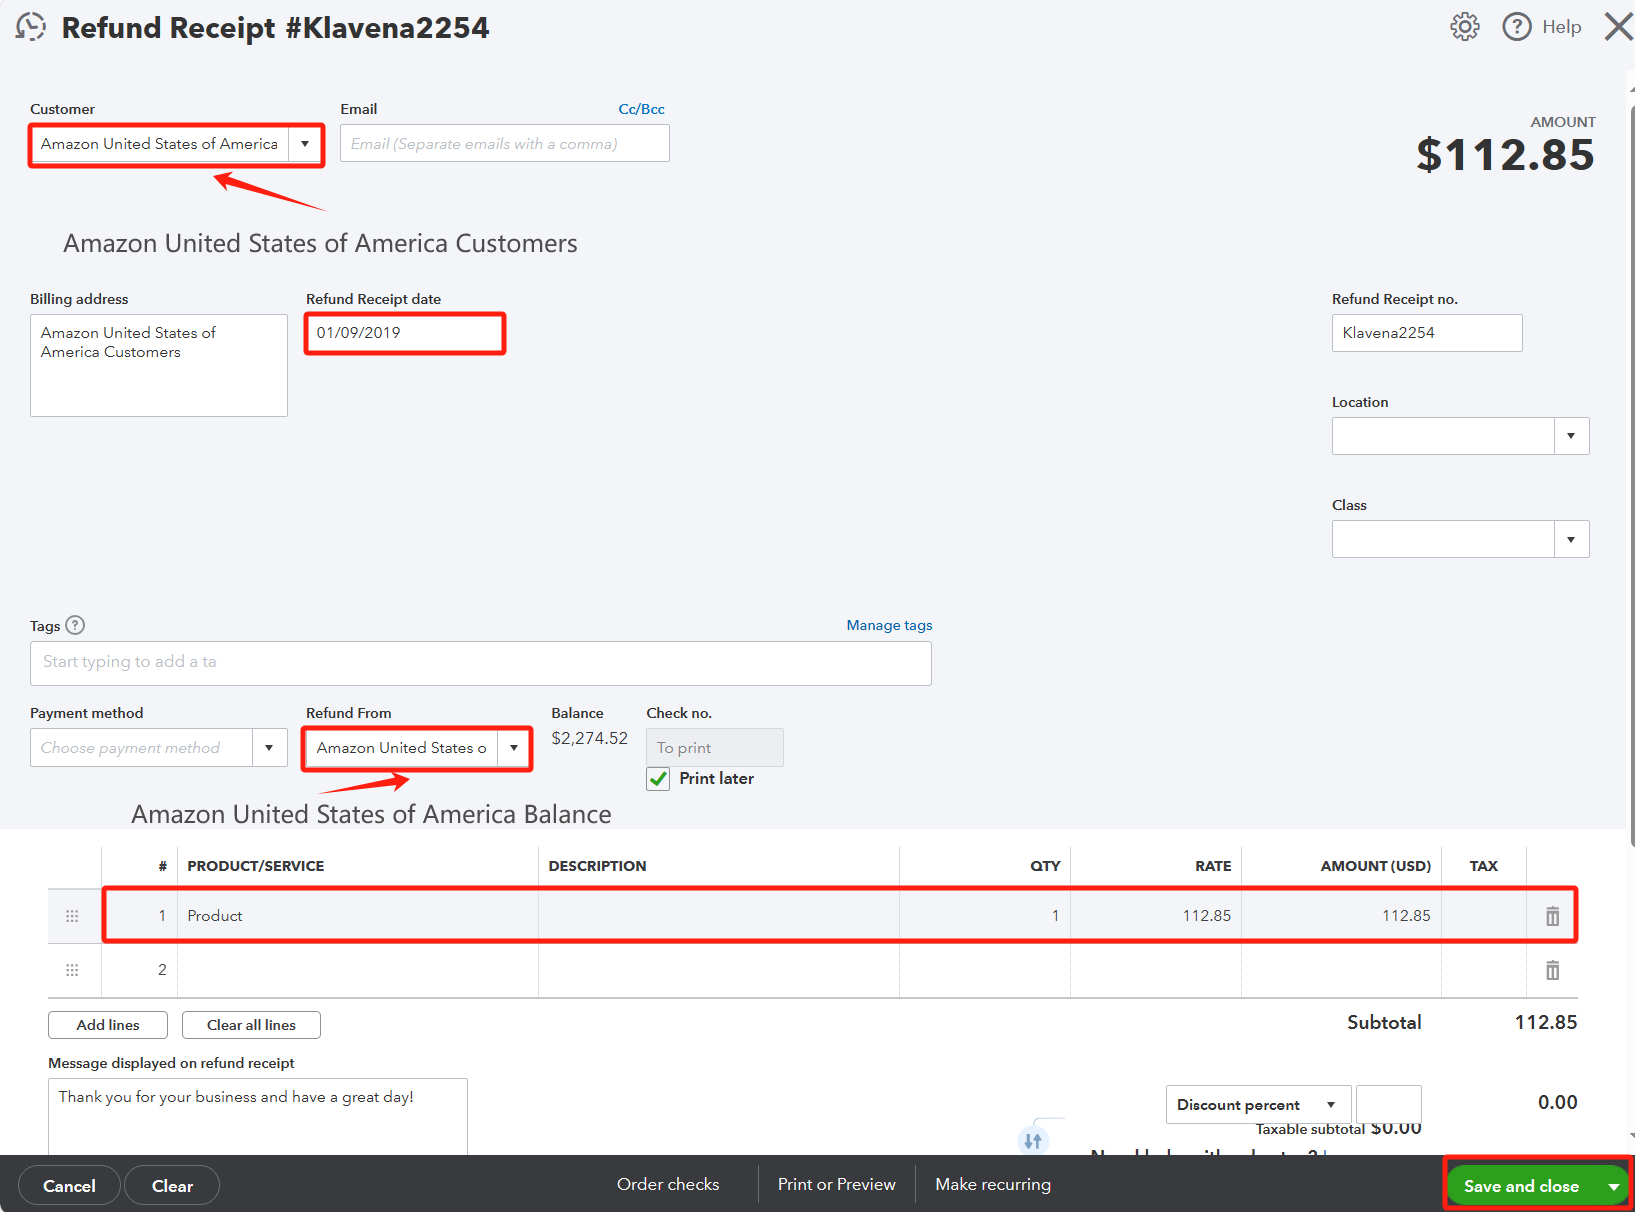
Refund Receipt
- Refunded sales -> Product
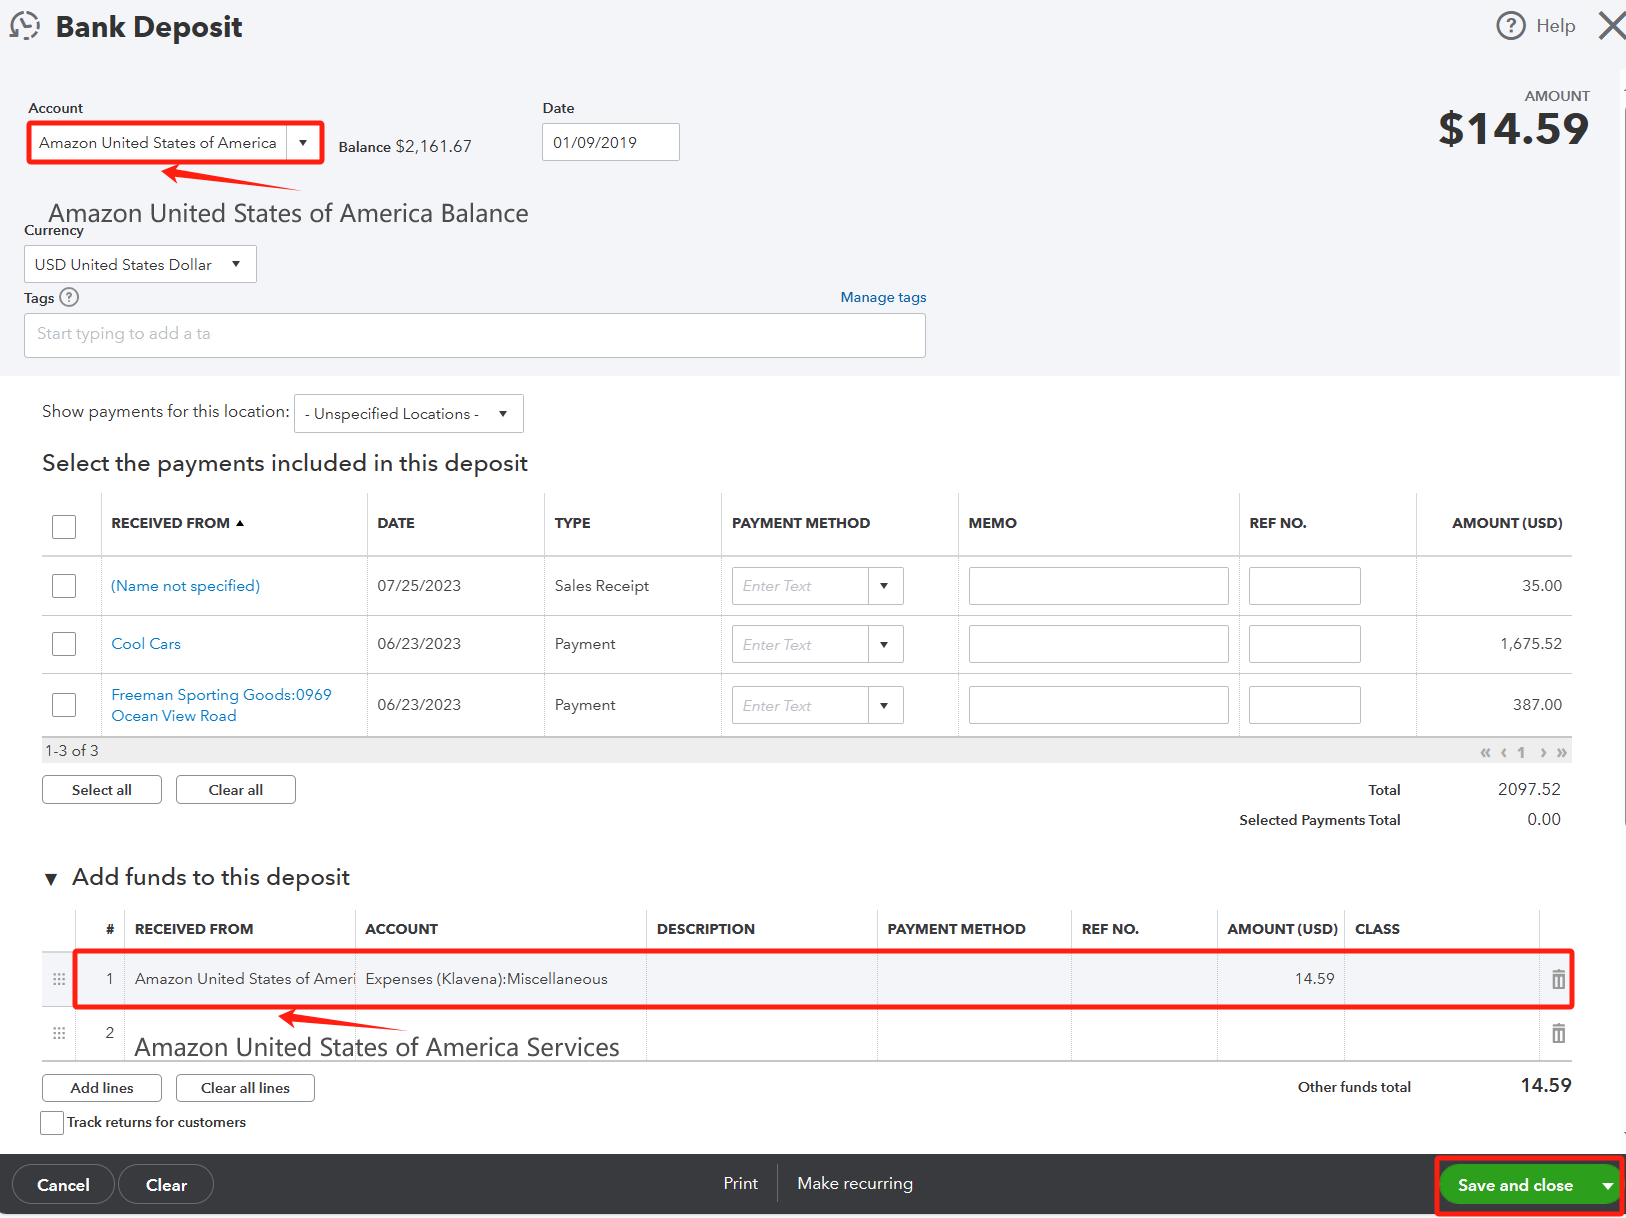
Deposit
- Refunded expenses -> Miscellaneous
End Result
Let's take a look at the result after entering the data into QuickBooks.
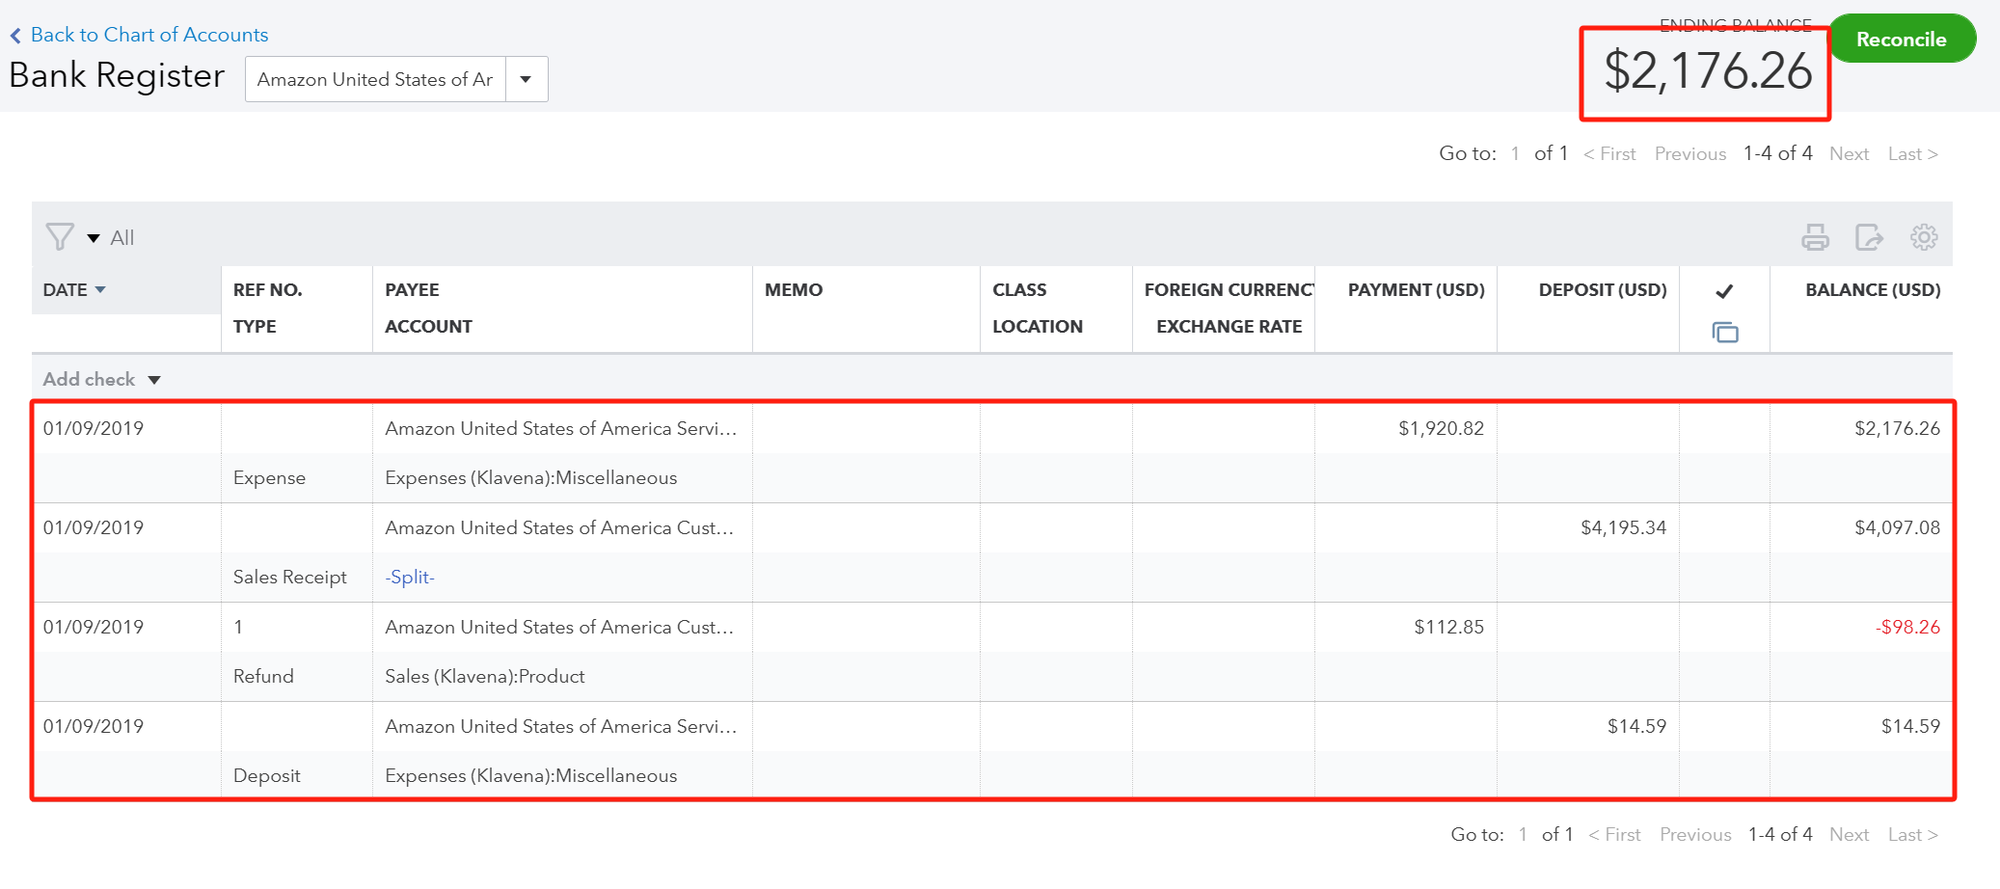
We can see that the balance in this chart of accounts matches exactly what is written on the settlement summary.
The overall numbers and the broken numbers should check out. At a high level, we've summarized this settlement period's data in terms of a single sales receipt, expense, refund receipt and deposit.
And if you want more broken down data, you can click edit to view the details inside each of them.
Let's move onto the Profit and Loss report.
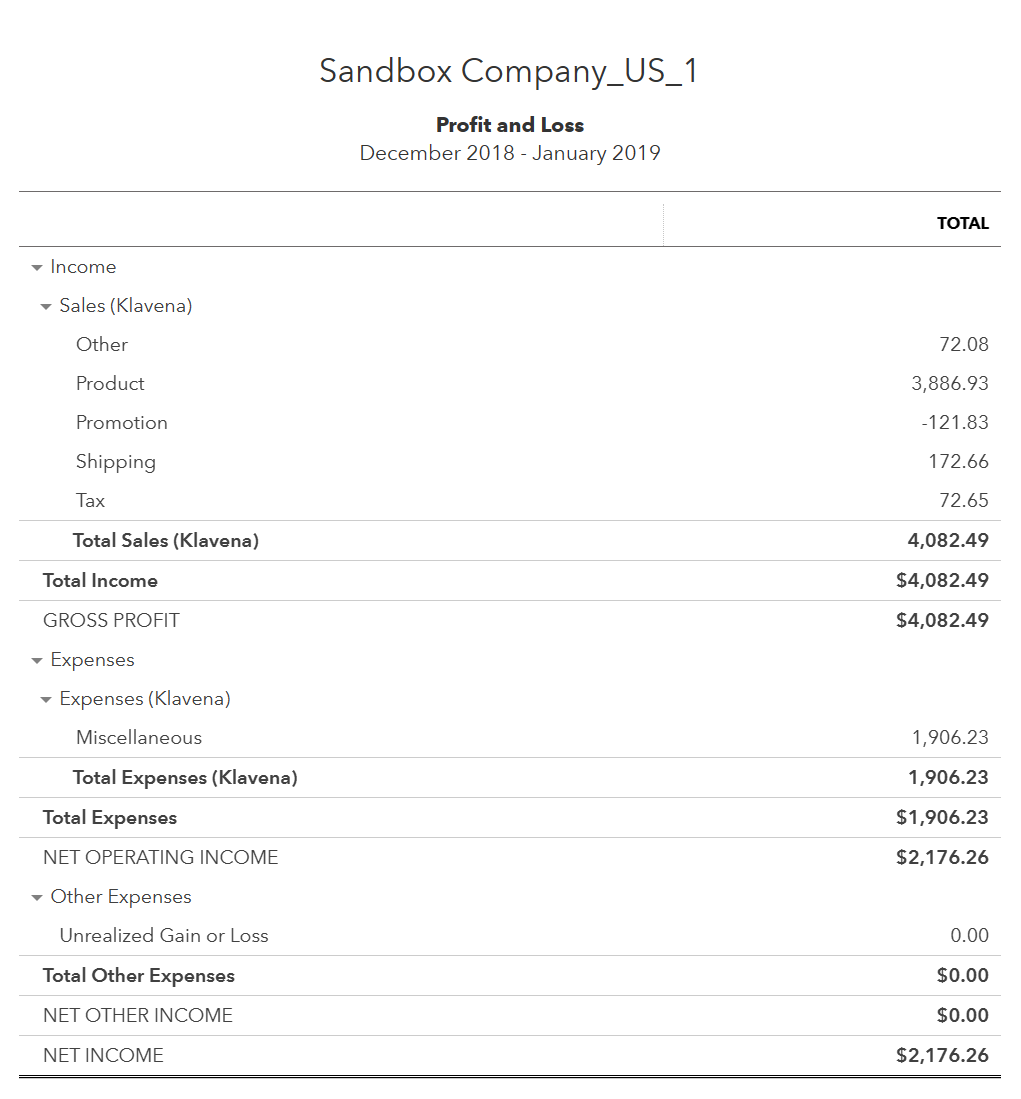
If you have other transactions, then the numbers won't match up perfectly. Here, the only transactions are those we have imported from Amazon for that specific settlement. You can see a detailed breakdown of Profit and Loss.
Now let's take a look at the Balance Sheet report.

Here, we can see that the Amazon United States of America Balance is holding all the balance in from that settlement period. Typically, when you sync your business bank account's with QuickBook's, you should be able to create a transfer transaction to represent that Amazon has transferred money from its holding account into your bank account.
Caveats
- Lack of Inventory Tracking and COGS: Because we are using summary data generated by Amazon's reports, you won't be able to see exactly which products you are selling in QuickBooks this way. Consequently, you also won't be able to create sales receipts with inventory items representing exactly which SKUs were sold. This means that the cost of goods sold (COGS) in QuickBooks won't be automatically calculated for you, so you'll likely need to enter this in manually with a different method.
- Difficult to categorize expenses properly: The only outputs of the report are FBA fees, Amazon fees, and other. This is really vague. Ideally, you want it split out to different categories like commission, fulfillment, storage, advertising, etc.
- Settlements that start and end in different months: The summary numbers are all written into QuickBooks with the date of the settlement period's end date. If this settlement spans December through January, then you'll have some of December's numbers in January. A big hassle for tax season.
How Klavena's software can help you
Klavena is a software that helps you automatically perform all these steps with code. This is no room for error as it meticulously checks for 100% accuracy. Your settlements will be automatically imported and reconciled in QuickBooks following this method, so you can leave this work to us and sleep soundly! :)
Morever, we remedy the caveats above because we parse through the cumbersome and detailed settlement csv file for you.
In addition to the manual steps in this guide, the software:
- Inventory tracking and COGS: we track which products are sold and sync this into QuickBooks so that QuickBooks can automatically calculate COGS for each sale.
- Categorizes expenses properly: each fee is assigned to its appropriate category for better insights into the business's financials.
- Writes data on a daily basis to prevent issues with settlements spanning multiple months: importing on a daily basis allows all sales to be written into QuickBooks on the day that they occurred.
- Automatic import and reconciliation: our proprietary reconciliation algorithm assures 100% accuracy.
Summary
And that wraps it up! We have learned how to successfully set up QuickBooks Online so that we can do our Amazon bookkeeping with it. We went over different methods of fetching summary data from Amazon, and how to write it into QuickBooks Online in a CPA-approved way. Lastly, we went over the caveats of this manual method and how Klavena's software can solve these issues.